Bringing the viral aesthetic of Cinnamoroll nails into your kitchen is the ultimate way to blend high-fashion nail art with gourmet pastry techniques. These cookies aren’t just treats; they are miniature canvases that mirror the dreamy, Y2K-inspired look of Sanrio’s most beloved character.
Whether you are a fan of premium press-on aesthetics or simply love a challenge in the kitchen, this recipe translates the “milky white gel base” and “3D resin charms” of professional manicures into delicious, edible art. We are taking the iconic almond-shaped nail silhouette and turning it into a buttery, crisp shortbread topped with a high-gloss marble glaze.
In this guide, you will learn how to master the delicate pastel baby blue marble effect and sculpt lightweight 3D Cinnamoroll figures that look exactly like custom-curved salon charms. Get ready to elevate your dessert game to a level that would make any Pinterest influencer envious.

Why You Will Love These Sweet Cinnamoroll Nail Cookies
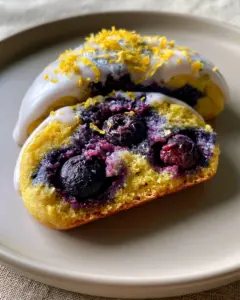
- Visual Precision: Every cookie perfectly replicates the Cinnamoroll nails blueprint, featuring a glossy milky white base and a soft baby blue marble swirl.
- Gourmet Flavor Profile: Unlike standard sugar cookies, we use a refined almond-infused shortbread to mimic the “clean manicured natural nail beds” described in the visual prompt.
- 3D Artistry: You will learn to create custom-curved 3D Cinnamoroll charms using edible modeling chocolate that contours perfectly to the “nail” surface.
- Ultra-Glossy Finish: We use a specialized corn syrup-based glaze to achieve that signature “ultra-glossy top coat” look seen in premium gel manicures.
Ingredients for Your Edible Nail Art Masterpiece
For the Almond Shortbread Bases:
1 cup (227g) unsalted butter, softened: High-quality butter provides the structural integrity needed for the slender almond nail shape.
3/4 cup (150g) granulated sugar: This provides sweetness without compromising the clean, sharp edges of the manicured nail design.
1 tsp (5ml) pure almond extract: This essential oil gives the cookies a professional flavor profile that complements the milky white theme.
2 1/4 cups (280g) all-purpose flour: The foundation of our cookie, ensuring it stays flat and smooth for the gel-like icing.
1/2 tsp (3g) fine sea salt: A crucial invisible ingredient that balances the sweetness of the glossy top coat.
For the Milky White & Marble Glaze:
2 cups (240g) powdered sugar, sifted: The base for our “milky white gel” effect, providing a smooth, opaque surface.
2 tbsp (30ml) whole milk: Creates the “milky” opacity required to match the Pinterest-style nail aesthetic.
2 tbsp (30ml) light corn syrup: The secret ingredient for that “ultra-glossy top coat” that hardens to a professional shine.
Pastel baby blue gel food coloring: Only a tiny drop is needed to create the delicate marble swirls seen in the Cinnamoroll nails blueprint.
For the 3D Charms & Accents:
4 oz (113g) white modeling chocolate: This serves as our “resin,” allowing us to sculpt custom-curved Cinnamoroll charms that hold their shape.
1/4 cup (50g) miniature flatback pearls (sugar dragees): These edible accents provide the final touch of elegance to the almond nails.
Essential Kitchen Tools for Precision Decorating
To achieve the “macro close-up” quality of professional Cinnamoroll nails, you will need a few specific tools. An almond-shaped cookie cutter is preferred, but you can also use a template and a sharp paring knife to ensure “clean manicured” edges.
A small offset spatula is necessary for smoothing the milky white base, while a toothpick or scribe tool is essential for dragging the baby blue gel into a perfect marble pattern. For the 3D charms, a silicone Cinnamoroll mold or a steady hand for sculpting will ensure the lightweight resin-look is achieved.

Master the Marble: Step-by-Step Edible Nail Tutorial
Baking the Almond Shortbread “Nail” Bases
Begin by creaming your butter and sugar until smooth, then incorporate the almond extract. Gradually add the flour and salt until a stiff dough forms; this mimics the “natural nail bed” density.
Roll the dough to a 1/4 inch (6mm) thickness and cut into elongated almond shapes. Chill the cutouts for 20 minutes before baking at 350°F (175°C) for 10-12 minutes until the edges are just barely set—do not let them brown, as we want a “clean” look.
Creating the Milky White and Baby Blue Marble Glaze
Whisk the powdered sugar, milk, and corn syrup until the glaze is thick enough to coat the back of a spoon but thin enough to self-level. This is your “milky white gel base.”
Dip the cooled cookies into the white glaze, letting the excess drip off. While the icing is wet, dot a tiny amount of pastel baby blue gel onto the surface and use a toothpick to swirl it into a soft marble design, just like the Cinnamoroll nails in the Pinterest photos.
Sculpting the 3D Cinnamoroll Modeling Chocolate Charms
Warm the modeling chocolate in your hands until it is pliable. Sculpt tiny Cinnamoroll heads with their iconic long ears, ensuring the back of the charm is slightly concave (custom-curved) to contour perfectly to the nail bed of the cookie.
Use a tiny amount of blue gel to paint the eyes and mouth. These charms are the centerpiece of the “macro close-up” thumbnail look, so take your time with the details.
The Final Assembly: Pearls and Glossy Top Coat
Once the marble glaze has set for 30 minutes, use a tiny drop of corn syrup to adhere the 3D Cinnamoroll charm to the “thumbnail” cookies. Place the miniature flatback pearls near the base of the other almond nails for an elegant accent.
If the glaze has lost any shine, you can lightly brush a thin layer of pure corn syrup over the entire surface to mimic the “ultra-glossy top coat” of a fresh manicure.
Professional Pastry Tips for Perfect Marble Effects
- Avoid Over-Mixing: When marbling the baby blue gel, only move the toothpick through the white glaze twice; over-mixing will turn the whole nail blue instead of creating a marble.
- Temperature Control: If your modeling chocolate gets too soft, pop it in the fridge for 5 minutes. You need it firm enough to hold the “custom-curved” shape of the Cinnamoroll ears.
- Gloss Factor: For the most “ultra-glossy” result, let the cookies dry in a cool, dry place. Humidity is the enemy of a glossy gel-look finish.
- Pearl Placement: Use tweezers to place the miniature flatback pearls. This ensures the “clean manicured” look remains smudge-free.
Preserving Your Edible Art: Storage and Freshness
These Cinnamoroll nails cookies are best enjoyed within 3 to 5 days. Store them in a single layer in an airtight container to prevent the 3D charms from being crushed or the glossy glaze from sticking.
Do not refrigerate the finished cookies, as the condensation can cause the “milky white gel” to sweat and lose its shine. If you are making them ahead of time, you can freeze the un-iced shortbread bases for up to a month and decorate them the day you plan to serve them.
Creative Pairings for a Sanrio-Themed Party
These elegant almond cookies are the perfect centerpiece for a sophisticated dessert table. To keep the theme going, consider serving them alongside creative cake pop flavors decorated in pastel hues.
For a complete Y2K aesthetic, you could even display them next to a Cinnamoroll acrylic painting or wear your favorite y2k press on nails while serving. If you want a more traditional dessert to balance the intricate nail cookies, a classic strawberry rhubarb pie or some fluffy peach cobbler cinnamon rolls would provide a wonderful rustic contrast to the clean, modern look of the nail art.
Common Questions About Edible Nail Art
Yes, the custom-curved 3D Cinnamoroll resin charms can be sculpted from modeling chocolate days in advance and stored in a cool, dry place.
Apply a tiny drop of pastel baby blue gel to the wet milky white base and use a toothpick to drag the color in a figure-eight motion.
Stored in an airtight container at room temperature, these cookies will remain fresh and maintain their glossy finish for up to 5 days.
The ‘ultra-glossy top coat’ is achieved by adding light corn syrup to the royal icing, which creates a high-shine finish that hardens like a gel manicure.
Modeling chocolate is a mixture of chocolate and corn syrup; it acts like clay, making it perfect for sculpting lightweight, 3D charms that are fully edible.
The Ultimate Cinnamoroll Nail Cookie Recipe

Cinnamoroll Nails: How to Make Edible 3D Almond Shortbread Cookies
Ingredients
Equipment
Method
- Cream butter and sugar, add flour and almond extract. Roll and cut into almond shapes, then bake at 350°F (175°C) for 12 minutes.
- Dip cookies in white glaze made of sugar, milk, and syrup. Swirl in baby blue gel food coloring for a marble effect.
- Hand-mold 3D Cinnamoroll charms from modeling chocolate and attach to the thumb cookies with a drop of syrup.
Notes
Use a scribe tool for the most precise marble swirls.

Closing & Call to Action
Creating these Cinnamoroll nails in cookie form is a rewarding experience that bridges the gap between beauty trends and culinary excellence. The combination of the almond shortbread and the glossy marble finish creates a sensory experience that is as delicious as it is visually stunning.
Did you try sculpting the 3D charms? We would love to see your results! Leave a comment below or share your “nail” photos with us on Pinterest. Don’t forget to sign up for our newsletter for more character-inspired recipes and aesthetic dessert tutorials!