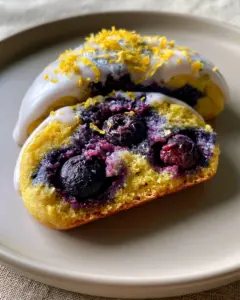
When you walk into a cafe, few things catch the eye quite like the vibrant display of cake pop flavors tucked behind the glass. Among them, the iconic pink vanilla cake pop stands as the undisputed champion of aesthetics and flavor. Its pastel pink hue, perfectly spherical shape, and those delicate white nonpareils create a sensory experience that is as much about the visual as it is about the taste.
Mastering this recipe at home allows you to bypass the coffee shop line while achieving that exact professional finish. We are focusing on a dense, moist pastel pink cake ball with a fine crumb texture, encased in a thin, flawlessly smooth coating of glossy pink candy melts. This isn’t just a snack; it is a miniature work of culinary art designed for high-impact presentation.
By following this guide, you will learn the forensic science behind the perfect binder-to-cake ratio. We will ensure your treats stay firmly on their matte white sticks while maintaining that signature “clean bite” that reveals a moist, vibrant interior. Let’s dive into the world of elevated cake pop flavors and recreate this pink masterpiece.

Why This Pink Vanilla Version Tops All Other Cake Pop Flavors
- Perfectly Balanced Crumb: Unlike store-bought versions that can be overly doughy, this recipe uses a specific crumbling technique to ensure a dense yet light texture.
- Glossy Visual Appeal: We utilize a specific thinning method for the candy melt coating to achieve a professional, mirror-like shine.
- Customizable Foundations: While we are focusing on pink vanilla today, this structural blueprint serves as the base for all your future cake pop recipes experiments.
- High-Contrast Decor: The stark white nonpareils against the glossy pink shell create a classic, high-end look suitable for any celebration.
Essential Components for the Moist Pink Center
Cake Flour (1 ½ cups / 190g): This provides a lower protein content than all-purpose flour. It is the secret to achieving that fine, tight crumb structure seen in the visual blueprint.
Unsalted Butter (½ cup / 115g): Softened butter is creamed with sugar to aerate the batter. This ensures the cake remains moist even after being crumbled and compressed into balls.
Granulated Sugar (¾ cup / 150g): Sugar provides sweetness and helps retain moisture. It also aids in the browning process, though we will keep the oven temperature low to maintain the pink color.
Large Eggs (2): Eggs provide the necessary structure and leavening. They act as the “glue” that keeps the delicate pink crumb together before we add the frosting binder.
Pink Gel Food Coloring (1-2 drops): Use professional-grade gel rather than liquid. Gel allows for a vibrant pastel pink without altering the chemical hydration of the cake batter.
Whole Milk (½ cup / 120ml): Milk adds richness and fat. This contributes to the “moist” descriptor in our visual recipe blueprint, preventing a dry or sandy mouthfeel.
Vanilla Extract (1 tsp / 5ml): High-quality Madagascar vanilla is essential. It provides the aromatic backbone that distinguishes gourmet cake pop flavors from generic sweets.
Baking Powder (1 ½ tsp / 7g): This is an invisible foundational ingredient. It provides the lift necessary so the cake isn’t a solid brick, allowing for a better crumble later.
The Glossy Shell and Decorative Elements
Pink Candy Melts (12 oz / 340g): These are specifically formulated for dipping. They provide the “thin, flawlessly smooth coating” required to match the professional smartphone photo aesthetic.
Paramount Crystals or Coconut Oil (1 tbsp / 15g): This is a crucial “invisible” ingredient. Adding fat to the melted candy lowers the viscosity, ensuring the coating isn’t too thick or clumpy.
White Nonpareil Sugar Sprinkles (2 tbsp / 30g): These tiny spheres provide the delicate scattering of white on top. Their matte finish provides a beautiful textural contrast to the glossy pink glaze.
Vanilla Frosting (2-3 tbsp / 30-45g): This acts as your binder. You only need a small amount to transform crumbs into a moldable “dough” that holds its round shape on the stick.
Tools Required for Professional Results
To achieve the look of a birthday cake pops pro, you need the right gear. A matte white paper lollipop stick is essential for the handheld photo look. You will also need a Styrofoam block or a dedicated cake pop stand to allow the coating to set without flat spots.
A digital kitchen scale is highly recommended for measuring the cake balls. Consistency is key for cake pop flavors that look uniform and professional. Finally, a deep, narrow microwave-safe bowl (like a silicone measuring cup) is best for dipping, as it allows for full submersion with less wasted candy.

Step 1: Crafting the Pink Vanilla Base
Preheat your oven to 350°F (175°C) and grease a 6-inch (15cm) round cake pan. In a stand mixer, cream the butter and sugar for 3-5 minutes until the mixture looks pale and fluffy.
Add the eggs one at a time, followed by the vanilla and the pink gel coloring. Observe the batter; it should be a vibrant, saturated pink. Remember that the color will slightly lighten as it bakes and again once crumbled.
Whisk together the dry ingredients and add them to the butter mixture alternating with the milk. Pour into the pan and bake for 25-30 minutes. The cake is done when a toothpick comes out clean, and the edges just begin to pull away from the pan.
Step 2: The Art of the Crumb and Binder
Once the cake has cooled completely, remove any browned edges with a serrated knife. You want only the soft, pink interior. Tear the cake into large chunks and place them into a large bowl.
Using your hands, crumble the cake until it resembles fine sand. There should be no large chunks remaining. This fine texture is what creates the “dense, moist pastel pink cake ball” mentioned in the visual prompt.
Add the vanilla frosting one tablespoon at a time. Mix thoroughly until the dough holds together when squeezed but isn’t sticky or greasy. If you add too much frosting, the cake pop will be too heavy and slide off the stick.
Step 3: Rolling and Structural Anchoring
Scoop approximately 1 tablespoon (about 30g) of the mixture and roll it between your palms. Apply even pressure to create a “perfectly round” sphere. Place these on a parchment-lined tray.
Melt a small handful of pink candy melts. Dip the tip of each matte white paper stick into the melted candy, then insert it about halfway into the cake ball. This creates a “solder” joint that prevents the pop from falling.
Chill the anchored cake balls in the refrigerator for 20-30 minutes. Do not freeze them. If the cake balls are too cold, the warm candy coating will crack as it cools and shrinks. We want a “flawlessly smooth” finish.
Step 4: Achieving the Glossy Pink Dip
Melt the remaining pink candy melts with the coconut oil in 30-second intervals, stirring vigorously in between. The mixture should flow off the spoon like warm honey. This ensures the “thin coating” described in our blueprint.
Hold the stick and submerge the cake ball entirely in the coating in one fluid motion. Pull it straight out—do not stir. Tap your wrist gently to remove excess coating, allowing it to flow back into the bowl.
While the glaze is still wet and showing a “gentle shine,” delicately scatter the white nonpareils over the top. Place the stick upright in your stand or Styrofoam block to set. The result should be a smooth, glossy shell with no drips.
Expert Tips for Success
- Temperature Control: Ensure your cake balls are room temperature or slightly chilled, but never frozen, before dipping to avoid the dreaded “shell cracking.”
- Thinning the Candy: If your candy melts are thick and gloppy, add more coconut oil a teaspoon at a time. The thinner the coating, the more professional the result.
- Removing Air Bubbles: After dipping, if you see a bubble, use a toothpick to pop it immediately and smooth the area before the candy sets.
- Flavor Variations: Once you master this, try incorporating crushed cookies for oreo cake inspired pops or different extracts.
Storage, Reheating & Freezing
These pink vanilla treats are best enjoyed within 2-3 days when stored at room temperature in an airtight container. The candy shell acts as a seal, keeping the moist pink center fresh. If you must refrigerate them, be aware that condensation may form on the glossy shell when brought back to room temperature.
For long-term storage, you can freeze the undecorated cake balls for up to 3 months. However, once the candy coating and sprinkles are applied, freezing is not recommended as it ruins the “glossy pink” visual appeal of the exterior.
What to Serve With These Iconic Pops
These pops are a standout on any dessert table, but they pair beautifully with other handheld treats. Consider serving them alongside homemade pop tarts for a nostalgic brunch-style dessert spread.
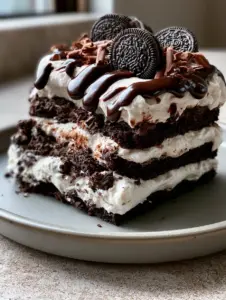
If you are hosting a larger event, contrast the soft pink of these pops with the deep tones of a chocolate oreo cake. For a summery vibe, the sweetness of the vanilla cake pop is perfectly cut by the tartness of strawberry rhubarb pie.
Frequently Asked Questions
Yes, you can use a boxed white cake mix and add pink gel coloring. Just be sure to bake it slightly less than the box instructions to maintain maximum moisture for crumbling.
Thin your melted candy with coconut oil or paramount crystals. Submerge the pop in one fluid motion and tap your wrist gently to remove excess without stirring.
Cracking occurs due to extreme temperature changes. If the cake balls are frozen when dipped, the expansion of the cake as it warms will crack the hardening shell.
This usually happens if the cake ball is too heavy (too much frosting) or if you didn’t ‘solder’ the stick by dipping it in melted candy before inserting it into the cake ball.
The Perfect Pink Vanilla Cake Pop Recipe
[Image-3]

Cake Pop Flavors: The Ultimate Pink Vanilla Starbucks Copycat Recipe
Ingredients
Equipment
Method
- Cream butter and sugar until fluffy, then add eggs, vanilla, and pink gel coloring until a vibrant pastel pink is achieved.
- Mix in dry ingredients and milk; bake at 350°F (175°C) for 25-30 minutes until a toothpick comes out clean.
- Once cooled, remove browned edges and crumble the pink cake into a fine sand-like texture.
- Add vanilla frosting until the mixture is moldable, roll into 12 perfectly round spheres, and insert sticks dipped in candy melts.
- Melt candy melts with coconut oil until glossy and thin; submerge each cake ball once to create a smooth, thin shell.
- Scatter white nonpareils over the wet coating and allow to set upright in a stand until the shell is hard and glossy.
Notes
Ensure the cake balls are room temperature when dipping to prevent the candy shell from cracking.

Bringing the Cafe Home
Creating professional-grade cake pop flavors is a rewarding culinary challenge that combines baking precision with artistic flair. By focusing on the fine crumb of the pink vanilla center and the mirror-like shine of the candy coating, you have created a dessert that looks like it stepped right out of a high-end bakery or a smartphone photo shoot.
We would love to see your results! Did you achieve that perfect glossy finish? Share your photos and tag us, or head over to our Pinterest for more dessert inspiration. Don’t forget to leave a comment below with your favorite cake pop variations!