There is something undeniably nostalgic about the combination of chocolate sandwich cookies and sweet, whipped cream. When you transform those elements into a towering, multi-layered Oreo cake, you aren’t just making a dessert; you are crafting an experience. This specific no-bake icebox version is designed for those who crave a professional, pâtisserie-style finish without ever having to turn on the oven.
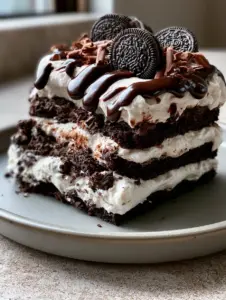
Imagine a handheld smartphone photo of a perfect slice, showcasing distinct, beautiful layers of crunchy dark chocolate cookie crust and a velvety whipped white cream filling. The texture is the hero here, oscillating between the snap of a biscuit and the cloud-like luxury of sweetened cream cheese. It is a visual masterpiece that looks just as good on a modern matte ceramic plate as it tastes on your tongue.
Whether you are hosting a summer soirée or looking for a centerpiece for a celebration, this Oreo cake delivers. The contrast of the deep, dark cocoa against the bright white filling, topped with a glossy dark chocolate drizzle and fine chocolate curls, creates a sophisticated aesthetic that belies its simple preparation. Let’s dive into the culinary science of why this no-bake method produces a superior crumb and a more stable slice than traditional baked versions.

Why This No-Bake Oreo Icebox Cake Works
- Textural Contrast: By using both crushed Oreo cookies in the crust and whole pieces in the filling, we achieve a rhythmic crunch that offsets the smooth cream.
- Structural Integrity: The inclusion of whipped cream cheese provides a tangy stability that prevents the cake from collapsing, even in warmer temperatures.
- Visual Sophistication: The triple-threat topping of glossy dark chocolate drizzle, mini Oreo cookies, and hand-grated chocolate curls makes this a “gram-worthy” dessert.
- Zero-Heat Effort: Perfect for high-temperature months when you want a no-bake chocolate peanut butter dessert or this decadent Oreo alternative.
Essential Components for Your Layered Masterpiece
To achieve the precise look described in our visual blueprint, each ingredient serves a specific structural and aesthetic purpose. We do not just want flavor; we want a slice that holds its sharp edges when cut.
Chocolate Sandwich Cookies (Oreos): You will need 36 standard cookies for the crust and filling, plus a handful of mini Oreo cookies for the garnish. The cocoa solids in the cookies provide the deep “black” color that contrasts so beautifully with the white filling.
Full-Fat Cream Cheese: 16 oz (450g) of brick-style cream cheese. This is the “glue” of our cake, providing the body and the slight acidity needed to balance the sugar.
Heavy Whipping Cream: 2 cups (480ml) of chilled heavy cream. It must be at least 36% milk fat to ensure it whips into stiff peaks, creating that “velvety whipped white cream filling” mentioned in our prompt.
Powdered Sugar: 1.5 cups (180g) of finely sifted powdered sugar. Unlike granulated sugar, this contains a touch of cornstarch which helps stabilize the whipped layers.
Unsalted Butter: 1/2 cup (115g) melted. This acts as the binder for your crunchy dark chocolate cookie crust, ensuring the base doesn’t crumble when sliced.
Dark Chocolate Chips or Bar: 4 oz (113g) for the drizzle and curls. A high-quality dark chocolate with at least 60% cacao will provide that “glossy dark chocolate drizzle” look and a sophisticated flavor profile.
Pure Vanilla Extract: 1 tbsp (15ml). This “invisible” ingredient rounds out the dairy notes and makes the Oreo flavor pop.
Must-Have Kitchen Tools for a Professional Finish
To get those distinct, beautiful layers, you need more than just a spoon. A 9-inch (23cm) springform pan is non-negotiable for an icebox Oreo cake. The removable sides allow you to reveal the layers without damaging the structure.
An electric hand mixer or a stand mixer is required to aerate the heavy cream and cream cheese. You will also need a sharp vegetable peeler or a microplane to create those fine grated chocolate curls that add a delicate, professional touch to the top of the cake.

Constructing the Crunchy Dark Chocolate Cookie Crust
Step 1: Pulverizing the Base
Place 24 Oreo cookies into a food processor. Pulse until you have fine, uniform crumbs. If you don’t have a processor, place them in a heavy-duty freezer bag and use a rolling pin to crush them. You are looking for the texture of wet sand once the butter is added.
Step 2: Binding and Setting
Transfer the crumbs to a bowl and stir in 1/2 cup (115g) of melted unsalted butter. Press this mixture firmly into the bottom of your springform pan. Use the bottom of a flat measuring cup to pack it down tightly. Chill this in the freezer for 10 minutes to set the foundation of your Oreo cake.
Creating the Velvety Whipped Cream Filling
Step 3: Aerating the Cream
In a chilled bowl, beat the 2 cups (480ml) of heavy cream until stiff peaks form. Sensory cue: the cream should be thick enough to hold its shape on the whisk without drooping. Set this aside in the refrigerator.
Step 4: The Cream Cheese Base
In a separate large bowl, beat the 16 oz (450g) of softened cream cheese with the 1.5 cups (180g) of powdered sugar and vanilla extract. Beat until completely smooth and free of lumps. This creates the “velvety” mouthfeel essential to the recipe.
Step 5: The Gentle Fold
Gently fold the whipped cream into the cream cheese mixture using a silicone spatula. Do not over-mix, or you will lose the air. Finally, fold in 12 coarsely chopped Oreo cookies. This ensures every bite has that “crushed chocolate biscuit” texture mentioned in the visual blueprint.
Assembling the Distinct Layers
Step 6: Layering for Visual Impact
Pour the filling over the chilled crust. Use an offset spatula to smooth the top perfectly flat. The secret to a professional Oreo cake is a level surface, which allows the drizzle to pool and run elegantly over the edges later.
Step 7: The Long Chill
Cover the pan with plastic wrap and refrigerate for at least 6 hours, preferably overnight. This time allows the cookies within the filling to soften slightly, creating that classic icebox cake texture that bridges the gap between a decadent chocolate Oreo cake and a creamy mousse.
Garnishing with Glossy Drizzle and Chocolate Curls
Step 8: The Dark Chocolate Drizzle
Melt 3 oz (85g) of dark chocolate with 1 tbsp of heavy cream in 20-second bursts in the microwave. Stir until glossy and smooth. Drizzle it in a zig-zag pattern across the top of the chilled cake. The contrast of the dark glossy drizzle against the white cream is the key visual anchor of this dish.
Step 9: Adding the Final Accents
Immediately place mini Oreo cookies into the drizzle so they adhere. Finally, take a block of dark chocolate and a vegetable peeler to create fine chocolate curls directly over the top. The varying sizes of chocolate—from the drizzle to the mini cookies to the fine curls—add incredible visual depth.
Expert Tips for a Flawless Slice
- The Clean Cut: To get the distinct layers shown in the smartphone photo, dip your knife in hot water and wipe it dry between every single cut. This prevents the cream filling from smearing into the dark crust.
- Room Temp Cream Cheese: Ensure your cream cheese is truly at room temperature before beating. Cold cream cheese will result in tiny white lumps that ruin the “velvety” aesthetic.
- Don’t Scrimp on Chill Time: If you cut the cake too early, the filling will bulge. The 6-hour minimum is essential for the moisture to migrate and set the structure.
- Cookie Freshness: While this is a great way to use up cookies, fresh, crunchy Oreos provide a better textural contrast against the soft filling than older, stale ones.
Variations and Flavor Pairings
While this Oreo cake is a star on its own, you can experiment with the flavor profile. If you enjoy the creaminess of this dessert, you might also love the texture of banana pudding cookies or the rich depth of brown butter espresso brownies.
For a summertime party, serve this alongside a refreshing strawberry rhubarb pie to offer guests a choice between a cool, creamy no-bake option and a traditional fruit pastry. The dark cocoa notes also pair exceptionally well with a sharp espresso or a glass of cold milk.
Frequently Asked Questions
Yes, icebox cakes actually benefit from being made 24 hours in advance. This allows the cookie pieces in the filling to soften slightly, creating a cohesive, cake-like texture.
You can, but be aware that the extra filling will make the cake much sweeter and slightly less stable. Standard Oreos provide the best balance of cookie-to-cream ratio for the crust.
No, pulse the entire cookie (filling and all). The cream inside the cookies helps bind the crust together along with the melted butter.
Dip a sharp chef’s knife in hot water and wipe it clean between every slice. This melts through the fat in the cream and chocolate, leaving a perfectly smooth edge.
This usually happens if the heavy cream wasn’t whipped to stiff peaks before folding, or if the cream cheese was too warm. Make sure to use cold heavy cream and chill the cake for the full 6 hours.
The Ultimate No-Bake Oreo Cake Recipe

Oreo Cake Recipe: The Ultimate Velvety No-Bake Icebox Delight
Ingredients
Equipment
Method
- Pulverize 24 Oreo cookies into fine crumbs using a food processor.
- Mix crumbs with melted butter and press firmly into a 9-inch springform pan. Freeze for 10 minutes.
- Beat heavy cream until stiff peaks form. Set aside in the fridge.
- Beat softened cream cheese, powdered sugar, and vanilla until velvety smooth.
- Gently fold the whipped cream and chopped Oreos into the cream cheese mixture.
- Spread filling over the crust and refrigerate for at least 6 hours.
- Drizzle with melted dark chocolate, top with mini Oreos, and add grated chocolate curls.
Notes
Ensure cream cheese is truly at room temperature for a velvety texture.

Storage and Make-Ahead Advice
This cake is a make-ahead dream. It actually tastes better on day two as the flavors meld. Store any leftovers in an airtight container in the refrigerator for up to 4 days. You can also freeze this Oreo cake for up to one month; just ensure it is wrapped tightly in foil and plastic wrap. Thaw in the fridge for 2 hours before serving for the best texture.
Master the Art of the Icebox Dessert
Creating this Oreo cake is a masterclass in how simple ingredients can produce extraordinary results when technique and presentation are prioritized. By following these steps to achieve the glossy drizzle and velvety layers, you’ve created a dessert that looks like it belongs in a high-end bakery window. If you enjoyed this recipe, please leave a comment below and share your photos with us! Don’t forget to save this to your favorite dessert boards on Pinterest.