There is a specific kind of magic that happens when deep, midnight-black cocoa meets the iconic crunch of a sandwich cookie. This chocolate Oreo cake isn’t just another dessert; it is a structural marvel designed for the true cocoa purist. If you have been searching for that elusive, ultra-moist sponge that looks as dark as obsidian and tastes like a gourmet dream, you have arrived at the right place.
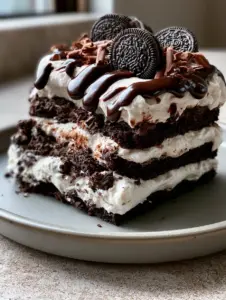
Inspired by professional patisserie aesthetics, this cake features three distinct layers of deep black cocoa sponge with a visible tight, tender crumb. We aren’t just tossing cookies into a batter; we are building a symphony of textures. From the stiff, bright white cookies and cream buttercream to the thick, glossy dark chocolate ganache drip, every element has been forensically designed to satisfy your deepest chocolate cravings.
Imagine a thick slice resting on a matte cream ceramic plate, the soft, diffused side-lit natural daylight catching the sheen of the ganache. That is the experience we are creating today. Whether you are making this for a special celebration or just a weekend project, this decadent Oreo cake recipe will redefine your expectations of what a homemade cake can be.

Why This Cookies and Cream Creation Stands Out
- The Obsidian Crumb: By using professional-grade black cocoa, we achieve a color and depth of flavor that standard Dutch-process simply cannot match.
- Textural Contrast: The marriage of ultra-soft sponge and coarse dark cookie chunks within the buttercream creates a sensory experience in every bite.
- Architectural Stability: Our buttercream is engineered to be stiff and stable, perfect for those high-reaching piped swirls and supporting the weight of a whole Oreo garnish.
- The Perfect Drip: We master the 1:1 ganache ratio to ensure a thick, glossy cascade that stops perfectly halfway down the slice, just like a professional food photograph.
Essential Elements for the Deepest Dark Cocoa Sponge
Black Cocoa Powder: 1.5 cups (180g). This is the secret to that “deep black” visual; it is more heavily alkalized than Dutch-process cocoa, providing an intense flavor reminiscent of an Oreo wafer.
Boiling Water: 1.5 cups (360ml). We use boiling water to “bloom” the cocoa, dissolving the solids and releasing the full aromatic potential of the chocolate before it hits the flour.
All-Purpose Flour: 3 cups (375g). A standard flour provides the necessary structure for a 3-layer cake while maintaining a tight, tender crumb that won’t crumble under the weight of the ganache.
Granulated Sugar: 3 cups (600g). Sugar does more than sweeten; it interferes with gluten development, ensuring the sponge remains incredibly moist and soft to the touch.
Buttermilk: 1.5 cups (360ml). The acidity in buttermilk reacts with the leavening agents to create a localized lift, resulting in a cake that is dense enough to stack but light enough to melt in your mouth.
Vegetable Oil: 0.75 cups (180ml). Unlike butter, oil remains liquid at room temperature, which is the key to a cake that stays moist for days without becoming “refrigerator-hard.”
Large Eggs: 3 units. Room temperature eggs act as the primary emulsifier, binding the fats and liquids into a smooth, cohesive batter that bakes evenly.
Baking Powder & Soda: 1.5 tsp (6g) each. This dual-leavening approach ensures a consistent rise across all three layers, preventing the dreaded “sunken center.”
The Science of Stiff Cookies and Cream Buttercream
Unsalted Butter: 2 cups (450g). We use high-fat European-style butter, softened but still cool to the touch, to ensure the frosting is bright white and holds its shape for piped swirls.
Powdered Sugar: 6 cups (750g). This high ratio of sugar to butter provides the “stiff” structural integrity required to sandwich three layers of heavy sponge without bulging.
Crushed Oreo Cookies: 1.5 cups (150g). Instead of a fine dust, we use coarse chunks to ensure the “visible dark cookie chunks” mentioned in our visual blueprint are present in every slice.
Heavy Cream: 3 tbsp (45ml). A small amount of cream helps to aerate the frosting, giving it a luxurious mouthfeel while keeping it stable enough for the cake pop scrap consistency if you have leftovers.

Tools for Professional Cake Construction
To achieve the “eye-level shot” perfection seen in our images, you will need a few specific tools. Three 8-inch (20cm) round cake pans are essential for even baking. A rotating cake turntable and an offset spatula will help you achieve those sharp, clean edges on the buttercream. For the ganache drip, a plastic squeeze bottle offers the most control, allowing you to stop the cascade exactly halfway down the slice.
Crafting the Obsidian Sponge Layers
Step 1: Blooming the Cocoa
In a medium heat-proof bowl, whisk the black cocoa powder with the boiling water until smooth. You will notice a deep, earthy aroma immediately. This “blooming” process ensures there are no pockets of dry cocoa in your finished chocolate Oreo cake.
Step 2: Combining the Dry Foundations
Sift the flour, sugar, baking powder, baking soda, and a pinch of salt into a large mixing bowl. Sifting is non-negotiable here; it aerates the flour to help achieve that “tight, tender crumb” we are looking for in the final slice.
Step 3: Emulsifying the Liquids
In a separate vessel, whisk together the buttermilk, oil, eggs, and vanilla. Slowly pour the liquid ingredients into the dry mixture while whisking on low speed. Once combined, gently fold in the bloomed cocoa mixture until the batter is a uniform, deep midnight black.
Step 4: The Precision Bake
Divide the batter equally between your three prepared pans. Bake at 350°F (175°C) for 30-35 minutes. You are looking for a visual cue: the edges should just begin to pull away from the pan, and a toothpick should come out with a few moist crumbs attached.
Building the Cookies and Cream Architecture
Step 5: Beating the White Buttercream
Whip the butter for at least 5 minutes until it is pale and voluminous. Gradually add the powdered sugar, one cup at a time. The goal is a bright white, stiff frosting. Fold in the coarse cookie chunks by hand to prevent the frosting from turning grey.
Step 6: The Assembly and Crumb Coat
Place the first layer on a matte ceramic plate. Spread a thick, even layer of buttercream, ensuring it reaches the very edge. Repeat with the remaining layers. Apply a thin “crumb coat” of frosting over the entire cake and chill for 30 minutes. This is vital for a clean final look.
Step 7: The Glossy Ganache Drip
Heat 0.5 cups (120ml) of heavy cream until just simmering, then pour over 4oz (115g) of dark chocolate chips. Let sit for 5 minutes, then stir until thick and glossy. Use a spoon or squeeze bottle to create drips around the top edge, allowing them to cascade down the sides.
Step 8: The Final Garnish
Pipe stiff frosting swirls on the top of each slice using a large star tip. Place a single, whole Oreo cookie into each swirl at a slight angle. The contrast of the whole cookie against the glossy drip creates the perfect visual centerpiece.
Expert Tips for Success
- Temperature Control: Ensure your cake layers are completely cold (ideally chilled) before frosting. Warm layers will melt the buttercream, causing the cake to slide.
- The Drip Test: Before committing to the whole cake, test one ganache drip on the side of a glass. If it runs to the bottom, let the ganache cool for another 2 minutes.
- Cookie Chunk Size: For the most professional look, keep your Oreo chunks about the size of a pea. This allows for smooth piping while still showing off those “coarse dark chunks.”
- Matte Plating: To replicate the “smartphone photo” aesthetic, use neutral, matte dishware. Glossy plates often create distracting reflections in food photography.
The Best Way to Store Your Masterpiece
This chocolate Oreo cake is remarkably resilient due to its oil-based sponge. You can store it in an airtight container at room temperature for up to 2 days. For longer storage, keep it in the refrigerator for up to 5 days. If you find yourself with extra cookies, consider making Oreo-stuffed birthday cookies to keep the theme going.
To freeze, wrap individual slices tightly in plastic wrap and then aluminum foil. They will stay fresh for up to 3 months. To serve from frozen, let the slice thaw in the refrigerator overnight to maintain the integrity of the ganache drip.
What to Pair with Indulgent Chocolate
Because this cake is so rich and dark, it pairs beautifully with high-contrast flavors. A cold glass of milk is the classic choice, but for a more sophisticated pairing, try it with a tart dragon fruit lemonade to cut through the sugar. If you are serving this at a party, consider adding brown butter rice krispie treats to your dessert table for a lighter, chewy alternative.
Frequently Asked Questions
Absolutely! Wrap the cooled sponge layers tightly in plastic wrap and store them in the fridge for 2 days or freeze for up to 3 months before frosting.
Yes, but the cake will be a lighter brown color and have a milder chocolate flavor. Black cocoa is essential for that signature dark ‘Oreo’ look and taste.
Whip your butter alone for at least 5-7 minutes before adding sugar. This aerates the butter and lightens the yellow tint significantly.
Folding the coarse cookie chunks into the buttercream just before assembly helps maintain their crunch. Serving the cake within 24 hours also ensures maximum texture.
Your ganache was likely still too warm. Let it sit at room temperature for another 5-10 minutes until it reaches the consistency of thick honey before applying it to a cold cake.
The Ultimate Chocolate Oreo Cake Recipe

Chocolate Oreo Cake: The Ultimate Triple-Layer Cookies and Cream Masterpiece
Ingredients
Equipment
Method
- Whisk black cocoa powder with boiling water until smooth and fragrant.
- Combine dry ingredients, then whisk in buttermilk, oil, and eggs before folding in the cocoa mixture.
- Divide into three 8-inch pans and bake at 350°F (175°C) for 30-35 minutes until the edges pull away.
- Whip butter and sugar until stiff and white, then fold in crushed Oreos.
- Stack layers with frosting, apply a crumb coat, and finish with a chocolate ganache drip and whole Oreo cookies.
Notes
Bloom your cocoa in boiling water to unlock the deepest possible chocolate flavor.
Share the Cocoa Love!
This chocolate Oreo cake is designed to be the “showstopper” at any gathering, from birthdays to holiday parties. The deep black cocoa sponge and the iconic cookies and cream filling create a flavor profile that is both nostalgic and sophisticated. If you enjoyed this recipe, please leave a comment below and share your results!
Don’t forget to follow me on Pinterest for more decadent dessert inspiration and high-RPM baking tips. Pin the image below to save this recipe for your next big celebration!